
Efficient Data Storage in JavaScript: Understanding Local and Session Storage with Input Forms


Table of contents
Data storage on the client side is essential for providing a seamless web browsing experience. Two options are available to achieve this: Local Storage and Session Storage. This tutorial will help you understand the concepts of Local Storage and Session Storage, highlighting their advantages, differences, and practical insights by developing an interactive input form.
You can use this information to develop applications that require the storage of user preferences or temporary data.
Prerequisites
Before starting this tutorial, ensure you have a basic understanding of HTML, CSS, and JavaScript. You'll also need a text editor and a web browser. I'll use Visual Studio Code (VSCode) as my editor for this tutorial.
Understanding Local Storage and Session Storage
What is Local Storage?
Local Storage is a storage method that allows web applications to store data on a user's device. The data remains intact even when the user closes the browser or navigates from the page. Storing user settings and preferences is now simple and effective. To save data in local storage, use:
```
localStorage.setItem('username', 'JohnDoe');
```
What is Session Storage?
Like Local Storage, Session Storage is a client-side storage mechanism, but with a crucial difference. While data is still stored as key-value pairs. Session Storage is a feature that allows a web page to store data in the user's browser for the duration of the page session. This means the data will be available as long as the user stays on the page, and you will lose the data when you leave or close the page. The data clears once the user closes the tab or browser. This makes Session Storage ideal for storing temporary information that doesn't need to persist across sessions. Use the code below to save with the Storage session:
```
sessionStorage.setItem('theme', 'light');
```
Check out Mozilla Developer Network (MDN) documentation on Local and Session Storage for more details.
Advantages of Client-Side Storage
Client-side storage provides several advantages that improve the functionality and responsiveness of web applications. Understanding these benefits is essential to make informed decisions about how and when to use storage options such as Local Storage and Session Storage. The benefits of client-side storage include:
Persistence
Local Storage has a significant advantage in its persistence feature. Even after the user closes the browser, data stored using Local Storage remains intact, allowing users to return to the website later and find their data still present. This makes it ideal for storing long-term preferences, user settings, and other essential information. You can check if Local Storage is supported by using the code below.
```
if (typeof(Storage) !== 'undefined') {
// Local Storage is supported
// Proceed with storing and retrieving data
} else {
// Local Storage is not supported
// Provide a fallback or alternative solution
}
```
Scope
Session Storage has a limited scope. It is bound to the duration of a page session. The stored data is cleared once the user closes the tab or browser. This makes Session Storage helpful for managing temporary information only relevant during the user's current interaction with the website. Use the code below to save data to Session Storage within a specific scope.
```
// To Save data to Session Storage within a specific scope
sessionStorage.setItem('sectionPreference', 'news');
```
Use Cases
Understanding the use cases for each storage option is crucial for effective implementation. Local Storage is ideal for scenarios where data needs to persist across sessions, such as user preferences and settings. Session Storage is more suitable for managing temporary data like form inputs and session-specific information. Use the code below if you want to choose between Local and Session Storage:
```
// Example: Choosing storage based on user preference
const storageType = userPrefersPersistentData ? localStorage : sessionStorage;
storageType.setItem('preference', 'value');
```
For further insights into these advantages and how to optimize client-side storage, refer to Google's Web Fundamentals guide on Web Storage
Building an Interactive Input Form
First, we must create an input form with HTML, CSS, and JavaScript. It will be an interactive input form to collect and store user data. Follow these steps to structure the HTML and enhance the form with Local Storage and Session Storage.
Creating HTML Structure
Create a basic HTML form with an input field to collect user data using the code below and paste it into the index.html file.
```
<!DOCTYPE html>
<html lang="en">
<head>
<meta charset="UTF-8">
<meta name="viewport" content="width=device-width, initial-scale=1.0">
<title>Data Storage Tutorial</title>
<link rel="stylesheet" href="style.css">
</head>
<body>
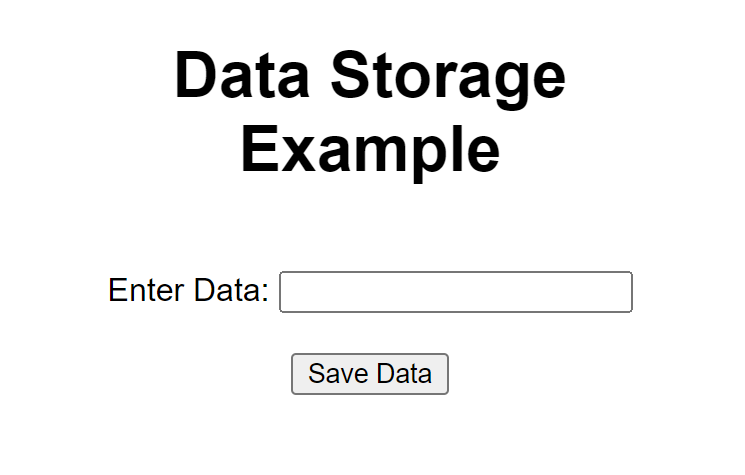
<h1>Data Storage Example</h1>
<form id="dataForm">
<label for="userData">Enter Data:</label>
<input type="text" id="userData" required>
<button type="button" onclick="saveData()">Save Data</button>
</form>
<script>
// Your JavaScript code will go here
</script>
</body>
</html>
```
Adding CSS Styling
Add basic CSS styling to styles.css file. This will make the form visually appealing with the code below:
```
body {
font-family: Arial, sans-serif;
text-align: center;
padding: 20px;
}
form {
margin-top: 20px;
}
button {
margin-top: 10px;
}
```
The form will look this way.
Now that you have created your input form let us delve into saving and retrieving data in local storage.
Saving Data to Local Storage and Retrieving Data from Local Storage
Saving Data to Local Storage
Add the JavaScript code below to the <script> tag to save data to Local Storage.
```
// Save data to Local Storage
function saveDataToLocal() {
const userData = document.getElementById('userData').value;
localStorage.setItem('userInput', userData);
alert('Data saved to Local Storage!');
}
```
To check the data you save to your local storage, right-click your webpage > click inspect > click “Application” > navigate to local storage > click your web page link.
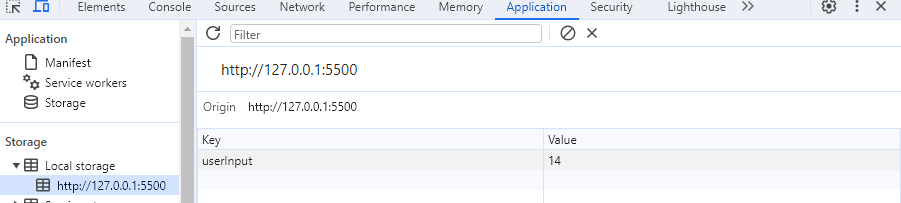
The “key” and “value” are on the right side. The "key" is a unique identifier used to store and retrieve data, while the "value" is the actual data associated with that key.
Retrieving Data from Local Storage
Retrieve data from Local Storage will display the data on the page
Use the code below to retrieve the data you save in the local storage. Remember, your code must be in the <script> tag.
```
// Retrieve data from Local Storage
window.onload = function() {
const savedData = localStorage.getItem('userInput');
if (savedData) {
alert('Data retrieved from Local Storage: ' + savedData);
}
};
```
Removing Data from Local Storage
You can also remove the data you save from the local storage. To remove the data, paste the code below to the <script> tag
```
// Remove data from Local Storage
function removeData() {
localStorage.removeItem('userInput');
alert('Data removed from Local Storage!');
}
````
Saving Data to Session Storage and Retrieving Data from Session Storage
Session Storage provides a valuable solution for storing only relevant information during a single session.
Saving Data to Session Storage
To save your data to the session storage, paste the code below to the <script> tag:
```
// Save data to Session Storage
function saveDataToSession() {
const userData = document.getElementById('userData').value;
sessionStorage.setItem('userInput', userData);
alert('Data saved to Session Storage!');
}
```
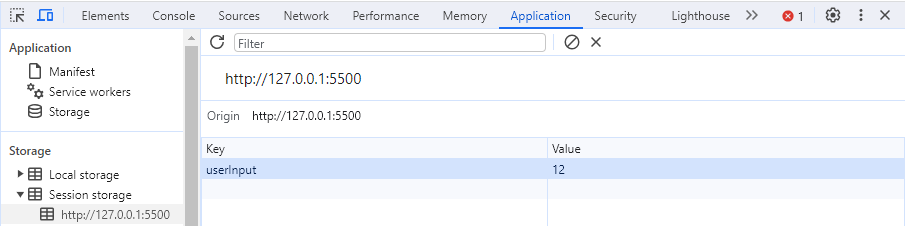
To check the data you save to your “Session Storage, right-click your webpage > click inspect > click “Application” > navigate to Session Storage > click your web page link.
Retrieving Data from Session Storage
To retrieve data from Session Storage and display it, paste the code below to the <script> tag
```
// Retrieve data from the Session Storage
window.onload = function() {
const savedData = sessionStorage.getItem('userInput');
if (savedData) {
alert('Data retrieved from Session Storage: ' + savedData);
}
};
```
Removing Data from Session Storage
To remove data from Session Storage, paste the code below to the <script> tag
```
// Remove data from Session Storage
function removeDataFromSession() {
sessionStorage.removeItem('userInput');
alert('Data removed from Session Storage!');
}
```
Conclusion
Now you understand how powerful Local and Session Storage is in JavaScript. It helps you store data better for websites. We learned how to save, get, and delete data using local and session storage. This helps you make smart choices for your needs. With this information, you can make websites better for users. I hope you liked this guide. Thanks for reading!